Table of Contents
Introduction: Why You Might Need to Take Apart a 15 Foot Round Trampoline
Owning a 15 foot round trampoline is a great way to bring fun and activity into your backyard, but there will come a time when you need to take it apart. Whether you are moving to a new house, preparing for the winter season, repairing worn-out parts, or simply rearranging your yard, knowing how to safely disassemble a trampoline is essential. Many people underestimate the size and weight of a 15-foot trampoline, which can make the disassembly process tricky without proper planning. Taking apart your trampoline not only helps with safe storage but also extends the life of your trampoline by protecting its springs, mat, and frame from weather damage. For families with kids, safety is a priority, and careful disassembly prevents accidents that can occur if the trampoline is left unattended or damaged. This guide will walk you through every step, making the process simple, organized, and stress-free, even for beginners.
Tools and Safety Tips Before Disassembly
Before attempting to take apart a 15 foot round trampoline, it is crucial to understand that preparation and the right tools can make the process far easier and much safer. Large trampolines are heavy, with tightly stretched springs and interconnected frames, which can pose risks if not handled properly. Wearing gloves to protect your hands from sharp edges and springs, along with sturdy footwear to avoid slips, is highly recommended. Having a spring puller tool or a strong hook designed for trampoline springs is essential because the springs are under significant tension, and attempting to remove them without the proper tool can cause injury or damage the trampoline. Additionally, using a soft surface, such as a folded blanket or padded mat, beneath the trampoline frame can prevent scratches and dents while disassembling the metal parts. Taking the time to gather the necessary wrenches, screwdrivers, and labeled storage bags for bolts and small parts ensures that each component is organized, making reassembly easier later on. Safety and organization at this stage not only protect you but also prevent the loss or damage of valuable components, especially the springs and frame connectors, which are critical for the trampoline’s stability when it is rebuilt.
Equally important is having a clear understanding of the workspace before beginning the disassembly. Ensuring the area around the trampoline is free from obstacles like furniture, garden tools, or uneven ground will give you ample room to maneuver large sections of the frame and the jumping mat safely. If possible, enlist the help of a friend or family member because handling a 15 foot trampoline alone can be difficult due to its size and weight. Planning the sequence of removal—starting with the netting and safety enclosure, then the padding, followed by the springs, mat, and finally the frame—will make the teardown process smoother and reduce stress. Having a checklist of steps and maintaining a methodical approach prevents accidental bending of the frame or overstretching of springs, which can happen if pieces are removed in the wrong order. By taking the time to prepare both the tools and the environment, disassembling a 15 foot round trampoline becomes manageable, safe, and efficient, ensuring that all parts remain in good condition for storage or later reassembly.
Preparing Your Trampoline and Yard
Before starting the process of taking apart a 15 foot round trampoline, preparing both the trampoline itself and the surrounding yard is essential to ensure safety and efficiency. Begin by clearing the area around the trampoline of any obstacles such as garden tools, toys, or furniture, as having an open space will allow you to move large pieces like the frame and jumping mat without risking injury or damage. It is also important to check the condition of the trampoline before disassembly, inspecting for rust, bent parts, or weakened springs, as identifying any damaged components ahead of time will prevent accidents during the process and make repairs easier once the trampoline is taken apart. Cleaning off dirt, leaves, and debris from the mat, padding, and frame not only protects the components from scratches but also makes it easier to handle them during storage or transport. If possible, position the trampoline on a flat, even surface, as uneven ground can create tension in the springs or instability in the frame while you are removing the parts. Preparing the workspace carefully and ensuring everything is clean and stable can significantly reduce the risk of injury and make the disassembly process smoother, especially with a large 15 foot round trampoline that has multiple heavy and interconnected components.
Equally important is planning how to organize the components once they are removed. Labeling small parts like bolts, nuts, and screws in ziplock bags or containers will make reassembly much easier later, and separating springs, padding, and frame sections in a logical order prevents confusion. Consider rolling the mat and padding carefully instead of folding them sharply to avoid creases or damage, and place the frame sections on a soft surface to prevent bending or scratches. Having a helper during this stage can make lifting heavy parts like the frame sections safer and faster, as attempting to move them alone could strain your back or cause accidental drops. Taking the time to prepare both the trampoline and the yard creates an organized and controlled environment, ensuring that disassembly is not only safer but also more efficient, leaving you confident that all components are preserved for storage or future reassembly.
Step-by-Step Process to Take Apart a 15 Foot Round Trampoline
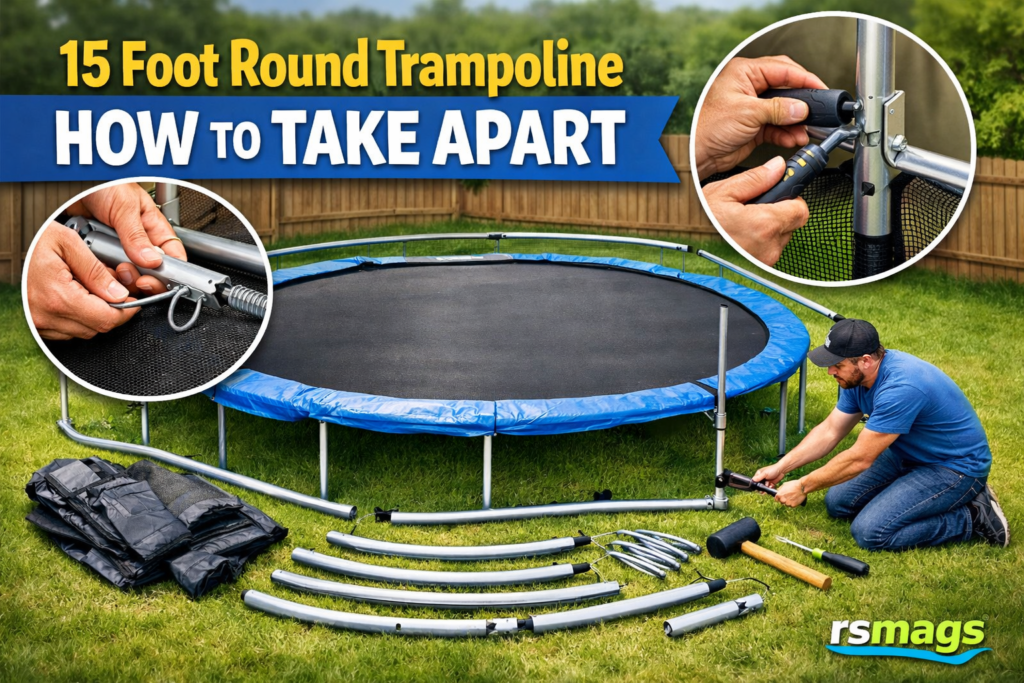
Disassembling a 15 foot round trampoline is a process that requires patience, organization, and a clear understanding of the structure of the trampoline. The first step is to remove the safety enclosure and netting. Carefully detach the poles that hold the netting in place and fold the netting neatly, making sure not to tear or snag the material on any sharp edges of the frame or springs. Label each pole and bag any small parts such as screws or brackets, so they do not get lost during storage. Once the netting is removed, the safety padding that covers the springs should be taken off and placed aside. This padding is usually heavy and bulky, so handling it gently prevents creases and ensures it remains in good condition for future use. At this stage, it is important to maintain an organized area around the trampoline because the springs and frame pieces will soon be removed, and keeping everything in order reduces the chance of accidents or lost parts. The preparation and methodical removal of these initial components set the tone for the rest of the disassembly, ensuring that each step can be completed smoothly and safely.
The next critical step is removing the trampoline springs, which are under significant tension and require careful handling. Using a spring puller tool, gradually release the tension by removing springs in a pattern, usually skipping every other spring initially to reduce sudden force and maintain balance on the frame. Collect all springs and place them in a labeled container to avoid confusion later. After the springs are removed, the jumping mat can be lifted off the frame and rolled or folded carefully for storage. Finally, the frame itself, which is usually made of several interlocking circular sections and supporting legs, can be disassembled. Unscrew the joints and separate each section, placing them on a soft surface to prevent scratches or bending. This step-by-step process, done carefully and in the correct order, ensures that all components remain intact, reduces the risk of injury, and makes it easier to reassemble the trampoline when needed. By following these steps methodically, taking apart a 15 foot round trampoline becomes a manageable task that can be done efficiently and safely, even by someone who is new to trampoline maintenance.
How Long Does Disassembly Take
The time it takes to disassemble a 15 foot round trampoline can vary greatly depending on experience, the number of people helping, and the condition of the trampoline. For someone attempting it alone, the process may take several hours, particularly because the springs are under tension and the frame sections are large and heavy. With two or more people, the disassembly becomes significantly faster and more manageable, as one person can stabilize the frame while the other removes springs or detaches the mat. The first time someone takes apart a trampoline, it is normal for the process to feel slow, as understanding the sequence of removing netting, padding, springs, mat, and frame requires care and attention. Experienced individuals can complete the teardown in one to two hours if all the necessary tools are on hand and the components are in good condition. Factors such as rusted parts, weather exposure, or damaged springs can also extend the time needed, requiring extra effort to safely remove stubborn elements without causing injury or bending the frame. Planning ahead, working methodically, and having assistance when possible are the best ways to reduce the time needed and make the process smoother and safer.
It is also helpful to consider the storage process when estimating how long disassembly will take because properly organizing and labeling springs, mat, padding, and frame sections adds to the overall time but saves frustration later. Rolling or folding the mat carefully, placing the padding flat, and storing frame sections on a soft surface prevents damage and ensures that reassembly will be simple and quick. For families who are disassembling the trampoline for seasonal storage, setting aside additional time to clean debris and dirt from the mat, padding, and frame is equally important, as it prevents mold, rust, or deterioration while the trampoline is in storage. By allowing enough time for careful disassembly, thorough cleaning, and organized storage, the trampoline will remain in excellent condition, and the process will feel less stressful, ensuring that both the equipment and the people handling it stay safe throughout the task.
How to Apply 15 15 15 Fertilizer — Step‑by‑Step Methods
Applying 15 15 15 fertilizer correctly is essential to ensure that plants receive the full benefits of the nutrients without causing damage. For gardens and vegetable beds, the fertilizer should be spread evenly around the base of each plant, keeping it a few inches away from stems and leaves to avoid burning. After spreading, lightly mix the fertilizer into the top layer of soil or simply water it in thoroughly so that the nutrients can reach the roots efficiently. Lawns require a slightly different approach, using a broadcast spreader to distribute the fertilizer evenly across the entire area. It is important to walk at a steady pace to ensure uniform coverage, as uneven application can lead to patches of burnt grass or areas with insufficient nutrition. For trees and shrubs, side-dressing is recommended, where fertilizer is placed around the drip line and gently worked into the soil without disturbing roots. For container plants, smaller, controlled doses are necessary, and the fertilizer should be watered in immediately to prevent accumulation that can harm the plant. Understanding the specific application method for each type of plant ensures maximum nutrient uptake and healthy, vigorous growth throughout the season.
The timing and environmental conditions during application are just as important as the method itself. 15 15 15 fertilizer should always be applied when the soil is slightly moist, which helps nutrients move quickly to the root zone and reduces the risk of root burn. Avoid applying on windy days to prevent uneven spreading or on days just before heavy rainfall, as this can wash away the fertilizer before it reaches the roots. For mixed gardens with a variety of plants, it may be helpful to apply smaller amounts more frequently rather than a large dose all at once, ensuring each plant receives the nutrients it needs without the risk of overload. By combining the right method with proper environmental awareness, gardeners can make the most of 15 15 15 fertilizer, supporting strong leaves, healthy roots, and vibrant blooms or fruits. Correct application not only improves growth but also helps maintain soil health, reduces waste, and promotes sustainable gardening practices that benefit the garden over the long term.
Storing Your Trampoline After Disassembly
Once a 15 foot round trampoline has been successfully taken apart, proper storage is essential to maintain the longevity of each component and ensure that the trampoline can be easily reassembled when needed. Start by storing the jumping mat and safety net in a dry, cool area away from direct sunlight, moisture, and rodents, as exposure to these elements can cause fading, mold, or small tears over time. Rolling the mat carefully rather than folding it prevents creases and weak points, while placing the safety net flat or loosely folded keeps it from tangling or ripping. The padding that covers the springs should also be stored flat or rolled on a soft surface to avoid compressing the foam or creating permanent bends in the vinyl. Frame sections, including legs and circular connectors, should be stacked in a way that prevents bending or scratching, ideally on a padded surface or leaning securely against a wall. Organizing and labeling hardware, springs, and small parts in clear containers or ziplock bags ensures nothing is lost and simplifies the reassembly process, making it quicker and less stressful when the trampoline is needed again.
In addition to organizing the components, it is helpful to consider the environment where the trampoline will be stored. A garage, shed, or storage unit is ideal, provided the area is dry, ventilated, and free from pests that could damage the materials. Avoid placing heavy objects on top of trampoline parts, as this could bend the frame or compress the padding. For families living in areas with harsh winters or high humidity, wrapping delicate components such as the mat, netting, and padding in protective covers or tarps adds an extra layer of protection against mold, mildew, or water damage. Keeping all components together in one area prevents misplacement and allows for easy access when it’s time to reassemble. Proper storage not only protects the trampoline parts but also extends their usable life, ensuring that your 15 foot round trampoline remains safe, durable, and ready for fun in the seasons to come.
Reassembling Your Trampoline
Reassembling a 15 foot round trampoline is essentially the reverse of the disassembly process, but it requires careful attention to ensure that each component is installed correctly and safely. Start by setting up the frame on a flat, stable surface, making sure all circular sections are aligned and securely connected. It is important to inspect each frame section for bends or damage before beginning, as any weak points could compromise the stability of the trampoline once it is fully assembled. Once the frame is secure, attach the legs carefully, ensuring they are evenly spaced and properly tightened. After the frame is stable, the next step is to reinstall the jumping mat by stretching it across the frame and gradually attaching the springs using a spring puller tool. Working in a systematic pattern, such as attaching opposite springs alternately, helps to distribute tension evenly and prevents excessive strain on any one part of the mat or frame. This careful approach minimizes the risk of tearing the mat or bending the frame, ensuring a safe and sturdy setup.
Once the mat and springs are in place, the padding should be reinstalled over the springs, covering them completely to provide a safe jumping surface and prevent injuries. Following this, the safety net and enclosure poles can be reattached, ensuring that the net is taut and the poles are secure. Throughout the reassembly process, it is crucial to double-check that all screws, bolts, and connections are tight and that the trampoline sits level on the ground. Taking the time to carefully reassemble the trampoline not only restores it to its original condition but also ensures that it remains safe for use by children and adults alike. By methodically reversing the steps of disassembly and paying close attention to detail, your 15 foot round trampoline can be returned to a fully functional and secure state, ready for jumping, exercise, and outdoor fun.
Frequently Asked Questions (FAQs)
Many people wonder if taking apart a 15 foot round trampoline is a difficult task, and the answer depends largely on preparation and experience. While the size and weight of a large trampoline may seem intimidating at first, following a systematic approach and having the right tools can make the process manageable for most adults. Questions often arise about whether it is necessary to have help, and while a single person can technically take apart a trampoline, having at least one other person makes the process much safer and faster. Safety considerations are also a common concern, particularly when removing springs under tension and lifting heavy frame sections. Using gloves, proper tools, and maintaining a clear workspace reduces the risk of injury, and careful labeling and organization of all parts ensures that nothing is lost or damaged during disassembly. Many first-time disassemblers are surprised by how much planning and care is involved, but once the process is understood, it becomes straightforward and can even be accomplished efficiently in under two hours with assistance.
Another set of common questions revolves around the best practices for storing trampoline components after disassembly and how to protect them for long-term use. People often ask if folding the mat or padding could damage it, and experts recommend rolling these parts carefully to prevent creases and stress points. Others wonder if springs and frame sections need to be coated or treated before storage; in most cases, keeping them in a dry, ventilated space away from sunlight and moisture is sufficient, although applying a light coat of lubricant to springs can prevent rust over time. Questions also arise about seasonal maintenance and whether it is necessary to disassemble the trampoline every winter. While not mandatory, taking apart a trampoline in areas with harsh weather can significantly extend its life and protect key components from damage. By understanding the common concerns and preparing for them, anyone can disassemble, store, and reassemble a 15 foot round trampoline safely and effectively, ensuring years of safe and enjoyable use for the whole family.
Final Thoughts and Best Practices
Taking apart a 15 foot round trampoline may seem like a daunting task at first, but with careful planning, the right tools, and a methodical approach, it can be done safely and efficiently. The key to a smooth disassembly lies in preparation: clearing and organizing your workspace, inspecting the trampoline for wear or damage, and gathering all necessary tools and safety equipment before beginning. By approaching the process step by step—starting with the safety enclosure, followed by padding, springs, mat, and frame—you can reduce the risk of injury and ensure that all components remain in good condition for storage or future use. Having help from a friend or family member not only makes the process faster but also ensures that heavy parts like the frame and mat are handled safely. Patience and attention to detail during disassembly not only protect the trampoline but also make reassembly easier and quicker when the trampoline is ready to be used again.
In addition to careful disassembly, proper storage and maintenance of the trampoline components play a significant role in extending the life of your 15 foot round trampoline. Storing the mat, padding, springs, and frame in a dry, ventilated area prevents rust, mold, and material deterioration, while labeling small parts and organizing hardware ensures that everything is easy to find when it is time to rebuild. Regular inspection of the trampoline before and after disassembly, including checking for bent frame sections, worn springs, or tears in the mat or net, allows you to address minor issues before they become major problems. Following these best practices guarantees that your trampoline remains safe, durable, and enjoyable for years to come, giving you and your family peace of mind and confidence in every jump. By combining safety, organization, and careful attention to each step, taking apart a 15 foot round trampoline can be a simple, stress-free task that preserves the value and longevity of this beloved backyard feature.